AutoRAGから進化した「Cloudflare AI Search」を検証。本番採用の有力候補になり得るその実力は?

はじめに
CloudflareのWorkers AI以外のAI関連の機能を調査してみようと思い、今回はAI Search(旧AutoRAG)について調べてみました。
Cloudflare Doc: https://developers.cloudflare.com/ai-search/
Cloudflare Blog: https://blog.cloudflare.com/introducing-autorag-on-cloudflare/
私はAI関連の機能については詳しくないので、この機能を調査・検証することで今後AI系の機能を導入してみたい方の参考になれば幸いです。

Cloudflare Doc: https://developers.cloudflare.com/ai-search/
Cloudflare Blog: https://blog.cloudflare.com/introducing-autorag-on-cloudflare/
私はAI関連の機能については詳しくないので、この機能を調査・検証することで今後AI系の機能を導入してみたい方の参考になれば幸いです。
AI Searchについて
どういった機能か?
2026/1現在、ベータ版の機能になります。
Cloudflareのドキュメントには以下のように記載されています。
AI Search(旧称AutoRAG)は、Cloudflareのマネージド検索サービスです。ウェブサイトや非構造化コンテンツなどのデータを接続すると、継続的に更新されるインデックスが自動的に作成され、アプリケーションやAIエージェントで自然言語によるクエリを実行できます。
RAGがCloudflareマネージド環境で構築が可能になる機能になります。
RAGについて: https://developers.cloudflare.com/ai-search/concepts/what-is-rag/
既存のAIモデルですと学習していること以外は正確に答える事ができないのですが、RAGを使用して情報を追加してあげることで、追加情報を学習して返答することができるようになります。
※例:内部システムのAPI情報など
Cloudflareのマネージドなサービスになりますので、インフラの管理をする必要がなく使用することができますので運用の負荷がありません。
利用方法とデータ保存先
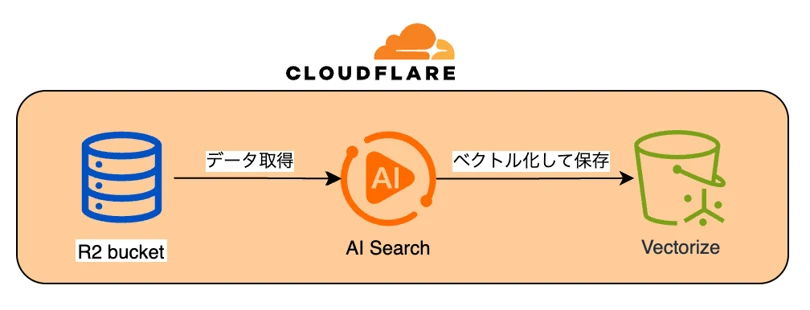
AI SearchはWorkersやREST APIなどで利用可能な機能です。
データ自体はCloudflare R2に保存され、その保存されたデータをベクトルに変換したものがCloudflare Vectorizeデータベースに保存される仕組みになっています。
仕組み: https://developers.cloudflare.com/ai-search/concepts/how-ai-search-works/
動作検証
文字で説明されるよりも実際に動かしたほうが理解しやすいと思いますので試していきます。
今回は架空のAPI情報をRAGとして読み込ませてAIから返答させてみます。
RAGで使用するデータを入れるバケットを用意します。
wranglerコマンドで作成しますので、まずCloudflareにログインします。
以下のコマンドでR2を作成します。
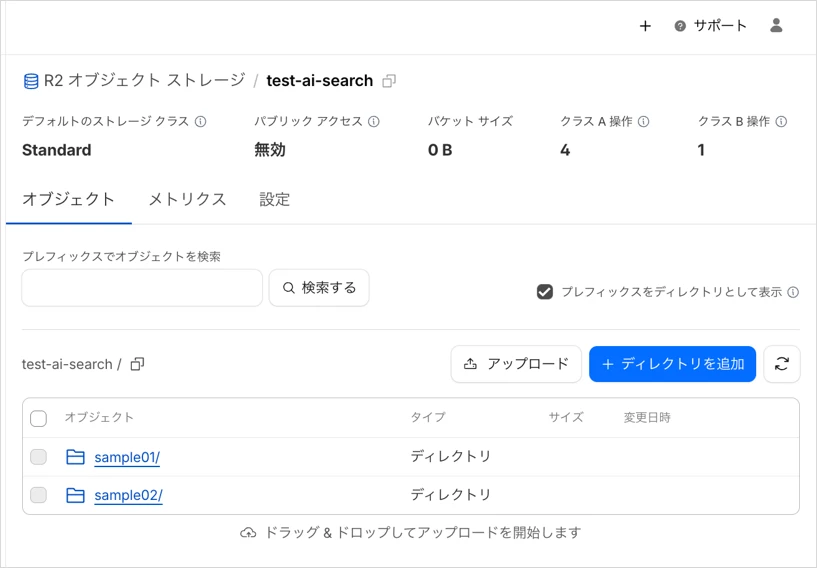
以下のようにフォルダとファイルを用意してR2バケットにアップロードします。
今回はマークダウンのファイルを採用してますが、それ以外の形式にも対応してます。以下のドキュメントを参考にして下さい。
Cloudflare Doc: https://developers.cloudflare.com/ai-search/configuration/data-source/r2/
ファイルの中身は以下のとおりです。独自のAPIの実装について記載しています。
※R2バケットのルートディレクトリ
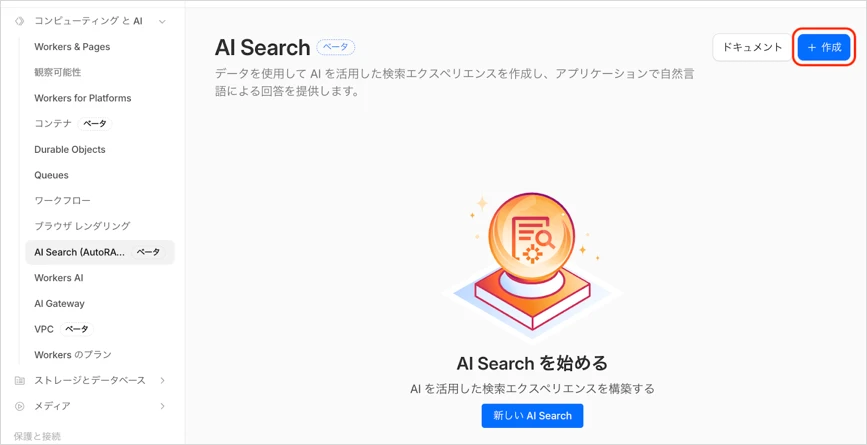
Cloudflareにログインして、コンピューティングとAI -> AI Searchに移動します。
画面に表示されている「作成」ボタンをクリックします。
「Get Started」をクリックします。

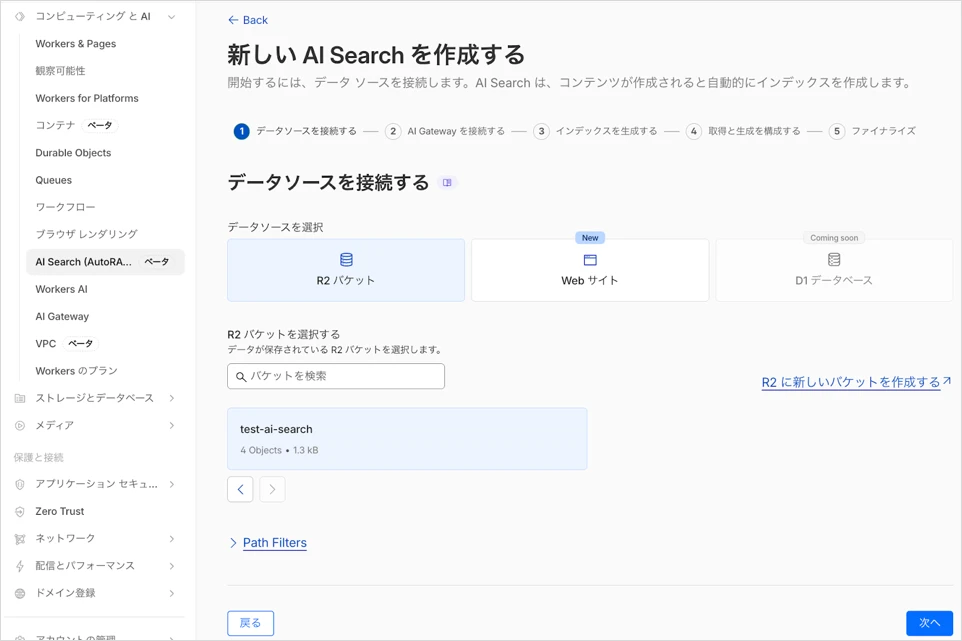
データソースでR2を選択、先程作成したR2バケットを指定して「次へ」をクリックします。
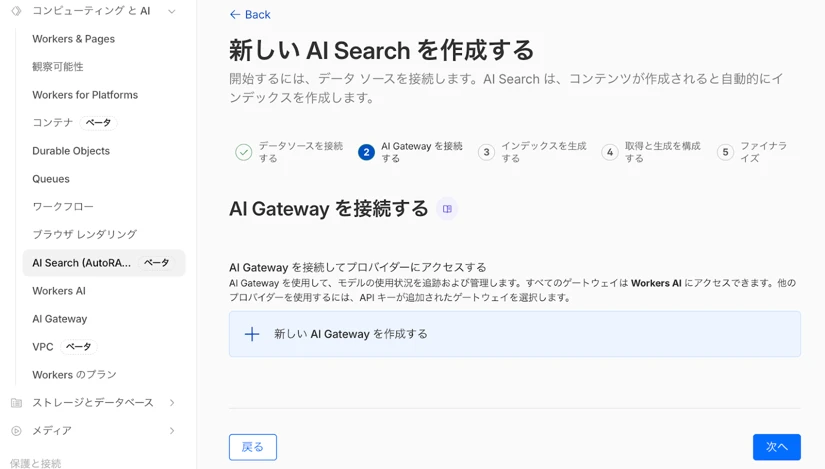
「新しい AI Gateway を作成する」を選択した状態で「次へ」をクリックします。
※AI GatewayはどれくらいAIを使用しているかなどを可視化できるサービスになります。
Cloudflare Doc: https://developers.cloudflare.com/ai-gateway/
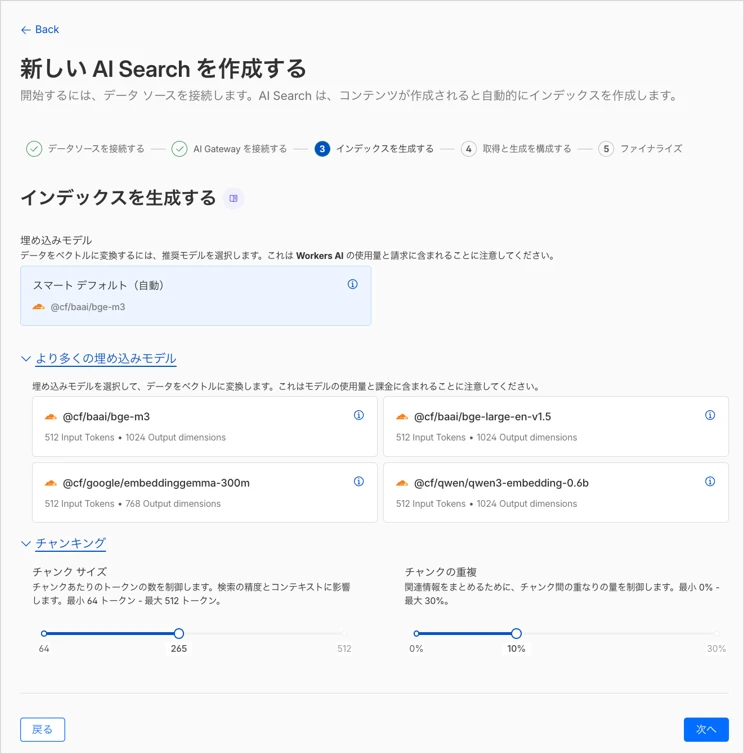
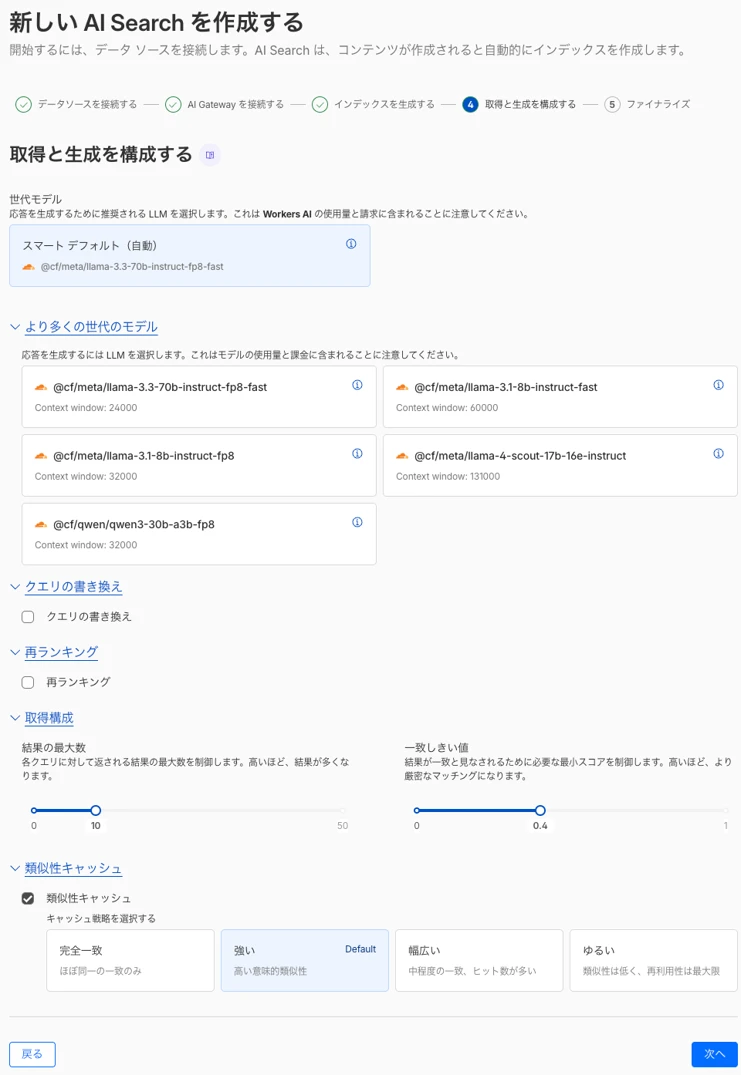
Cloudflare Vectorizeのインデックスを作成するモデルを選択します。
ここでは初期で選択されている「@cf/baai/bge-m3」を使用します。環境に合わせて選択して下さい。
AI Searchはデータソースの更新を自動的に監視し、 6時間ごとにコンテンツの再インデックスを行ってくれます。
チャンキング(チャンク)については、AIがデータを分割して検索しやすくするために設定します。
検索精度を変更したい場合は変更してみて下さい。
ここでは初期設定のままで進めます。
Cloudflare Doc: https://developers.cloudflare.com/ai-search/configuration/chunking/
続いて以下の設定をします。今回はデフォルトのまま進めていきますが、環境に合わせて変更していただいて問題ありません。
 ※画像内のURLはポップアップからリンクできます
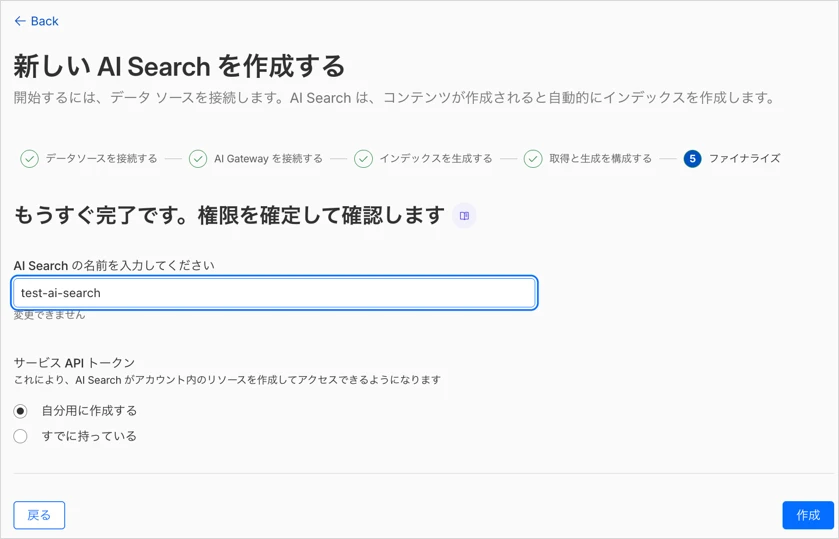
AI Searchの名前を任意の値にして下さい。
また、サービスAPI トークンは「自分用に作成する」(新規でAPI Tokenを作成)を選択して「作成」をします。
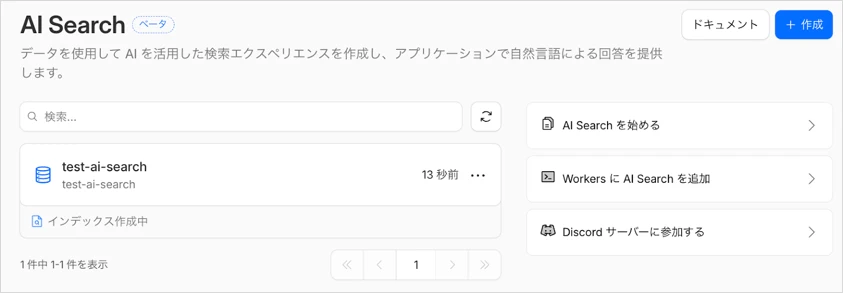
インデックス作成中のステータスになりますので少し待ちます。
少し待つと準備完了となります。
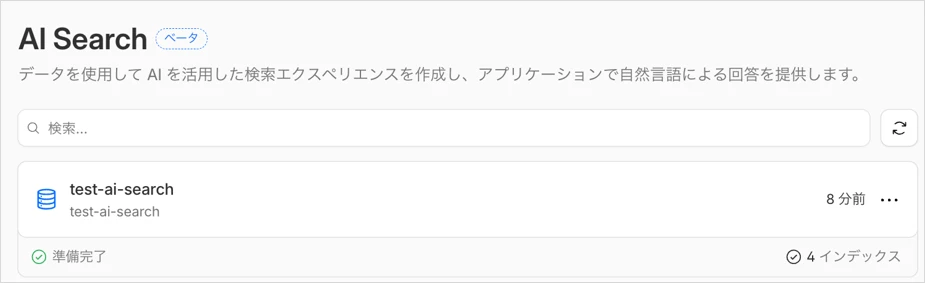
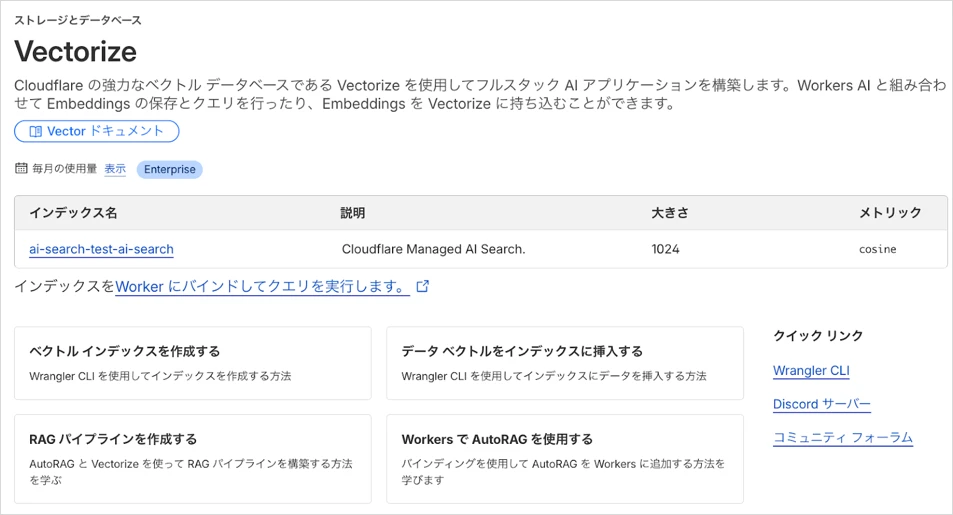
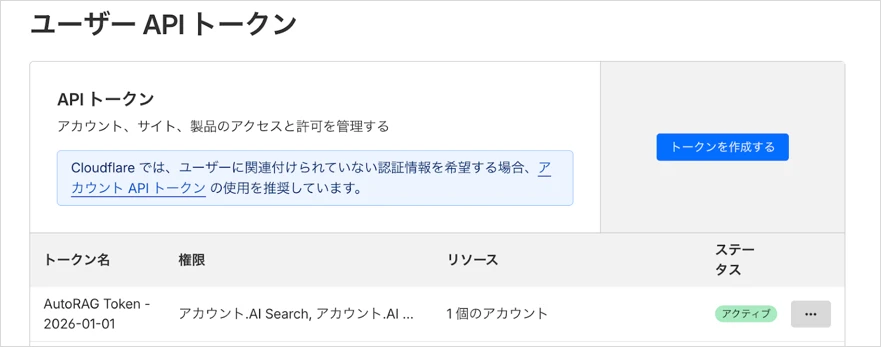
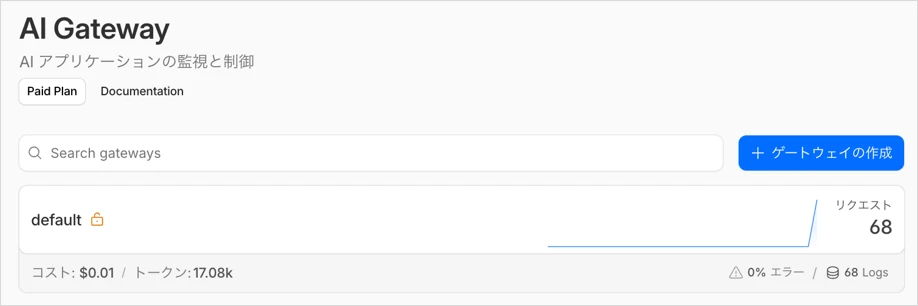
Cloudflare Vectorize、ユーザAPI トークン、AI Gatewayも作成されてることが確認できます。
・Vectorize画面
・ユーザAPIトークン画面
・AI Gateway画面
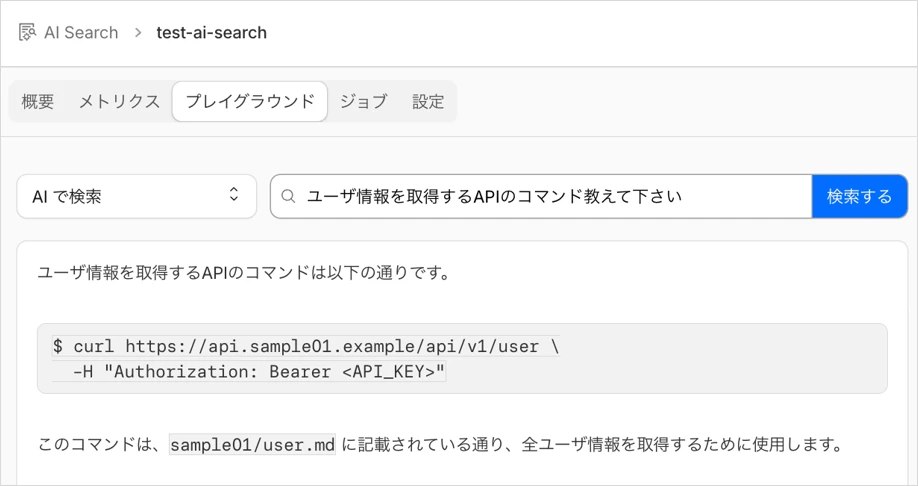
作成したAI Searchの「プレイグラウンド」タブからクエリを実行して、RAGからデータが取り込まれたデータで返答がされるか確認してみます。
クエリで「ユーザ情報を取得するAPIのコマンド教えて下さい」と聞いてみます。
別のクエリで「APIで取得できるデータの内容を教えて下さい」と聞いてみます。
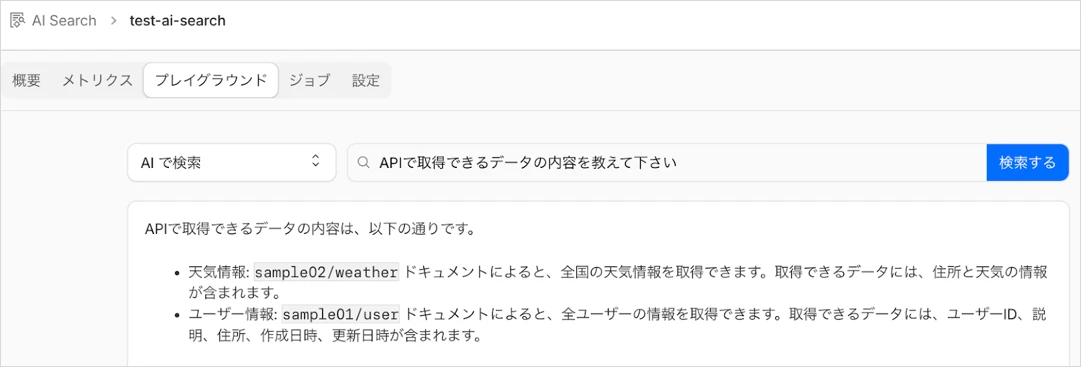
R2バケットに置いたデータの内容をAI Searchが返しており、無事に動いてることが確認できました。

今回は架空のAPI情報をRAGとして読み込ませてAIから返答させてみます。
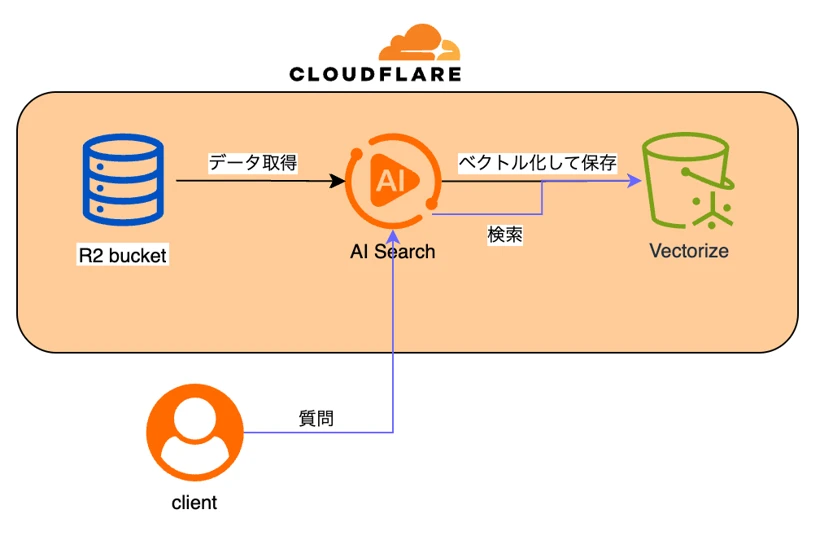
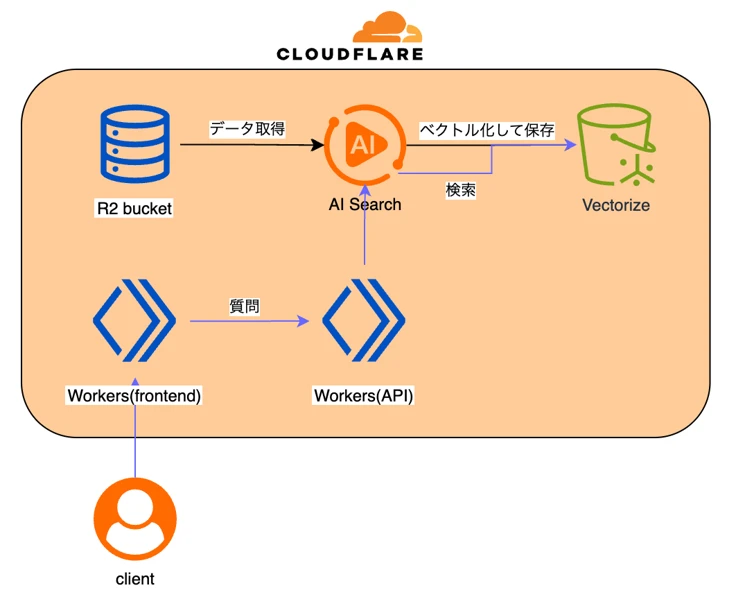
今回の検証の構成図
R2バケットの作成
RAGで使用するデータを入れるバケットを用意します。
wranglerコマンドで作成しますので、まずCloudflareにログインします。
$ npx wrangler login
$ npx wrangler whoami
以下のコマンドでR2を作成します。
$ npx wrangler r2 bucket create test-ai-search
ファイルのアップロード
以下のようにフォルダとファイルを用意してR2バケットにアップロードします。
今回はマークダウンのファイルを採用してますが、それ以外の形式にも対応してます。以下のドキュメントを参考にして下さい。
Cloudflare Doc: https://developers.cloudflare.com/ai-search/configuration/data-source/r2/
$ tree .
.
├── sample01
│   ├── api-reference.md
│   └── user.md
└── sample02
    ├── api-reference.md
    └── weather.md
ファイルの中身は以下のとおりです。独自のAPIの実装について記載しています。
sample01/api-reference.md
# sample_01_API_REFERENCE.md

---

last_updated: 2025-12-23

---

## Base URL

- `https://api.sample01.example/`

## 認証

- `Authorization: Bearer <API_KEY>`
sample01/user.md
# user

## GET /api/v1/user

全ユーザ情報取得

### コマンド例

```
$ curl https://api.sample01.example/api/v1/user
  -H "Authorization: Bearer <API_KEY>"
```

### Response

```
{
  "success": true
  "errors": [
    {
      "code": 001,
      "message": "message",
    }
  ],
  "result": [
    {
      "user": "user-001",
      "description": "description-001"
      "address": "tokyo"
      "created_on": "2020-01-01T08:00:00Z",
      "modified_on": "2020-01-10T14:00:00Z",
    },
    {
      "user": "user-002",
      "description": "description-002"
      "address": "osaka"
      "created_on": "2025-01-02T08:00:00Z",
      "modified_on": "2025-01-10T14:00:00Z",
    }
  ],
}
```
sample02/api-reference.md
# sample_02_API_REFERENCE.md

---

last_updated: 2025-10-01

---

## Base URL

- `https://api.sample02.example/`

## 認証

- `Authorization: Bearer <API_KEY>`
sample02/weather.md
# weather

## GET /api/v1/weather

全国の天気情報取得

### コマンド例

```
$ curl https://api.sample02.example/api/v1/weather
  -H "Authorization: Bearer <API_KEY>"
```

### Response

```
{
  "success": true
  "errors": [
    {
      "code": 001,
      "message": "message",
    }
  ],
  "result": [
    {
      "address": "tokyo",
      "weather": "sunny"
    }
  ],
}
```
※R2バケットのルートディレクトリ
AI Searchの作成
Cloudflareにログインして、コンピューティングとAI -> AI Searchに移動します。
画面に表示されている「作成」ボタンをクリックします。
「Get Started」をクリックします。
データソースでR2を選択、先程作成したR2バケットを指定して「次へ」をクリックします。
「新しい AI Gateway を作成する」を選択した状態で「次へ」をクリックします。
※AI GatewayはどれくらいAIを使用しているかなどを可視化できるサービスになります。
Cloudflare Doc: https://developers.cloudflare.com/ai-gateway/
Cloudflare Vectorizeのインデックスを作成するモデルを選択します。
ここでは初期で選択されている「@cf/baai/bge-m3」を使用します。環境に合わせて選択して下さい。
AI Searchはデータソースの更新を自動的に監視し、 6時間ごとにコンテンツの再インデックスを行ってくれます。
チャンキング(チャンク)については、AIがデータを分割して検索しやすくするために設定します。
検索精度を変更したい場合は変更してみて下さい。
ここでは初期設定のままで進めます。
Cloudflare Doc: https://developers.cloudflare.com/ai-search/configuration/chunking/
続いて以下の設定をします。今回はデフォルトのまま進めていきますが、環境に合わせて変更していただいて問題ありません。
※画像内のURLはポップアップからリンクできますAI Searchの名前を任意の値にして下さい。
また、サービスAPI トークンは「自分用に作成する」(新規でAPI Tokenを作成)を選択して「作成」をします。
インデックス作成中のステータスになりますので少し待ちます。
少し待つと準備完了となります。
Cloudflare Vectorize、ユーザAPI トークン、AI Gatewayも作成されてることが確認できます。
・Vectorize画面
・ユーザAPIトークン画面
・AI Gateway画面
作成したAI Searchの「プレイグラウンド」タブからクエリを実行して、RAGからデータが取り込まれたデータで返答がされるか確認してみます。
クエリで「ユーザ情報を取得するAPIのコマンド教えて下さい」と聞いてみます。
別のクエリで「APIで取得できるデータの内容を教えて下さい」と聞いてみます。
R2バケットに置いたデータの内容をAI Searchが返しており、無事に動いてることが確認できました。
Workersから接続しての動作検証
実際にサービスで使う場合にはWorkersからAI Searchに接続して使用することが多いと思いますので、その検証もしてみます。
Workersを作成します。設定を指定したのは以下となります。
作成したディレクトリに移動してコードを編集していきます。
`wrangler.jsonc`を以下のように編集します。
`src/index.ts`を以下のように編集します。
AI_SEARCH_NAMEには作成したAI Searchの名前を指定して下さい。
以下のコマンドでWorkers(API)をdeployします。
Workersを作成します。設定を指定したのは以下となります。
作成したディレクトリに移動してコードを編集していきます。
以下のコマンドでreact-markdownをインストールします。
`src/App.tsx`を以下のように編集します。
WORKERS_URLにWorkers(API)の開発用のURL(workers.dev)を指定します。
`src/App.css`を以下のように編集します。
以下のコマンドでWorkers(frontend)をdeployします。
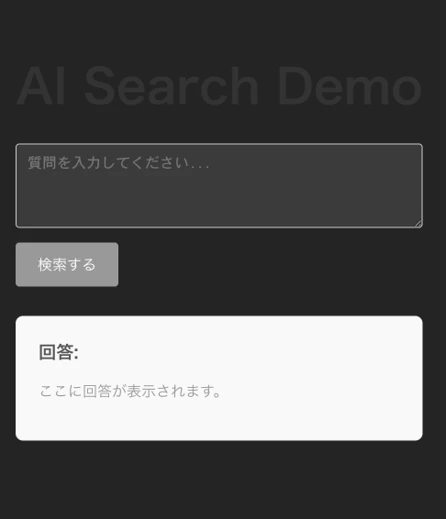
Workersのfrontendの開発用のURL(workers.dev)にブラウザからアクセスします。
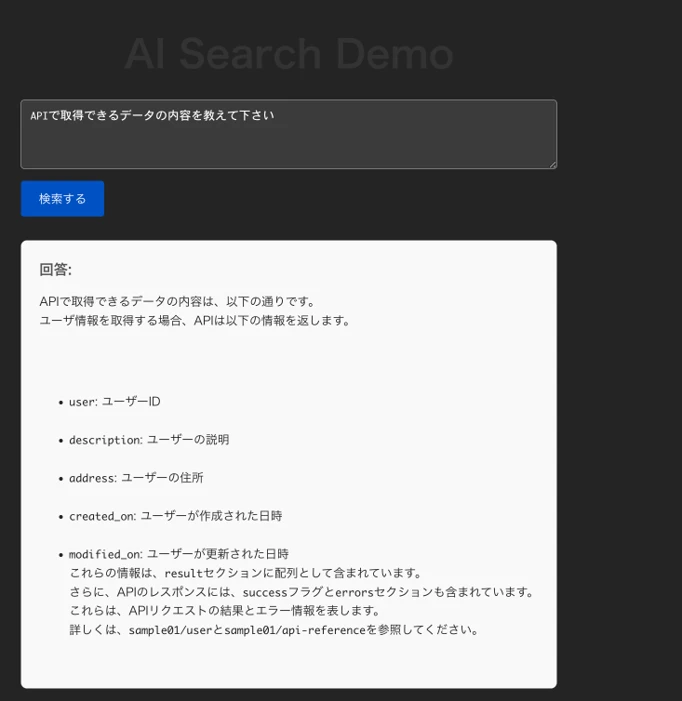
質問の入力欄で「APIで取得できるデータの内容を教えて下さい」と聞いてみます。
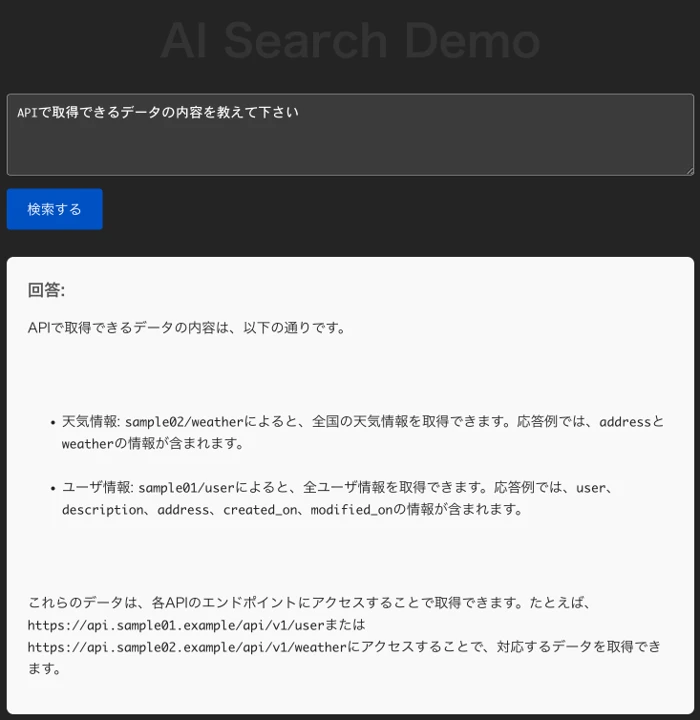
無事にAIから回答を得ることができました。
今回の検証の構成図
Workers(API)の作成
Workersを作成します。設定を指定したのは以下となります。
$ npm create cloudflare@latest -- test-api-ai-search

>Need to install the following packages:
>create-cloudflare@2.61.0
>Ok to proceed? (y)

...
├ What would you like to start with?
│ category Hello World example
│
├ Which template would you like to use?
│ type Worker only
│
├ Which language do you want to use?
│ lang TypeScript
...
├ Do you want to use git for version control?
│ no git
│
╰ Application configured

╭ Deploy with Cloudflare Step 3 of 3
│
├ Do you want to deploy your application?
│ no deploy via `npm run deploy`
│
╰ Done
...
作成したディレクトリに移動してコードを編集していきます。
$ cd test-api-ai-search/
Workers(API)の編集とdeploy
`wrangler.jsonc`を以下のように編集します。
{
	"$schema": "node_modules/wrangler/config-schema.json",
	"name": "test-api-ai-search",
	"main": "src/index.ts",
	"compatibility_date": "2026-01-01",
	"ai": {
		"binding": "AI"
	}
}
`src/index.ts`を以下のように編集します。
AI_SEARCH_NAMEには作成したAI Searchの名前を指定して下さい。
export interface Env {
	AI: any;
}

const CORS_HEADERS = {
	'Access-Control-Allow-Origin': '*',
	'Access-Control-Allow-Methods': 'GET, HEAD, POST, OPTIONS',
	'Access-Control-Allow-Headers': 'Content-Type',
};

export default {
	async fetch(request: Request, env: Env, ctx: ExecutionContext): Promise<Response> {
		if (request.method === 'OPTIONS') {
			return new Response(null, {
				headers: CORS_HEADERS,
			});
		}

		if (request.method !== 'POST') {
			return new Response('Method Not Allowed', {
				status: 405,
				headers: CORS_HEADERS,
			});
		}

		try {
			const body = (await request.json()) as { query?: string };
			const userQuery = body.query;

			if (!userQuery) {
				return new Response('Missing "query" in request body', {
					status: 400,
					headers: CORS_HEADERS,
				});
			}

			const AI_SEARCH_NAME = 'test-ai-search';

			const aiResponse = await env.AI.autorag(AI_SEARCH_NAME).aiSearch({
				query: userQuery,
				stream: true,
				rewrite_query: true,
			});

			return new Response(aiResponse.body, {
				headers: {
					...CORS_HEADERS,
					'Content-Type': 'text/event-stream',
					'Cache-Control': 'no-cache',
					Connection: 'keep-alive',
				},
			});
		} catch (e: any) {
			return new Response(`Error: ${e.message}`, { status: 500, headers: CORS_HEADERS });
		}
	},
};
以下のコマンドでWorkers(API)をdeployします。
$ npx wrangler deploy
Workers(frontend)の作成
Workersを作成します。設定を指定したのは以下となります。
$ npm create cloudflare@latest -- test-front-ai-search --framework=react

>Need to install the following packages:
>create-vite@7.1.1
>Ok to proceed? (y)

├ Do you want to use git for version control?
│ no git
│
╰ Application configured

╭ Deploy with Cloudflare Step 3 of 3
│
├ Do you want to deploy your application?
│ no deploy via `npm run deploy`
│
╰ Done
作成したディレクトリに移動してコードを編集していきます。
$ cd test-frontend-ai-search/
Workers(API)の編集とdeploy
以下のコマンドでreact-markdownをインストールします。
$ npm install react-markdown
`src/App.tsx`を以下のように編集します。
WORKERS_URLにWorkers(API)の開発用のURL(workers.dev)を指定します。
import React, { useState, useCallback } from "react";
import ReactMarkdown from "react-markdown";
import "./App.css";

function App() {
  const [query, setQuery] = useState("");
  const [answer, setAnswer] = useState("");
  const [isLoading, setIsLoading] = useState(false);

  const WORKERS_URL = "https://xxxxxxx.workers.dev";

  const handleSubmit = useCallback(
    async (e: React.FormEvent) => {
      e.preventDefault();
      if (!query.trim()) return;

      setIsLoading(true);
      setAnswer("");

      try {
        const response = await fetch(WORKERS_URL, {
          method: "POST",
          headers: { "Content-Type": "application/json" },
          body: JSON.stringify({ query }),
        });

        if (!response.ok || !response.body) {
          throw new Error(`HTTP Error: ${response.status}`);
        }

        const reader = response.body
          .pipeThrough(new TextDecoderStream())
          .getReader();

        let buffer = "";

        while (true) {
          const { value, done } = await reader.read();
          if (done) break;

          buffer += value;

          const lines = buffer.split("n");

          buffer = lines.pop() || "";

          for (const line of lines) {
            const trimmedLine = line.trim();

            if (trimmedLine.startsWith("data: ")) {
              const jsonStr = trimmedLine.replace("data: ", "");

              if (jsonStr === "[DONE]") continue;

              try {
                const data = JSON.parse(jsonStr);
                if (data.response) {
                  setAnswer((prev) => prev + data.response);
                }
              } catch (e) {
                console.error("JSON Parse Error:", e);
              }
            }
          }
        }
      } catch (error) {
        console.error("Error fetching answer:", error);
        setAnswer("エラーが発生しました。回答を取得できませんでした。");
      } finally {
        setIsLoading(false);
      }
    },
    [query]
  );

  return (
    <div className="container">
      <h1>AI Search Demo</h1>

      <form onSubmit={handleSubmit} className="search-form">
        <textarea
          className="query-input"
          value={query}
          onChange={(e) => setQuery(e.target.value)}
          placeholder="質問を入力してください..."
          disabled={isLoading}
          rows={4}
        />
        <button
          type="submit"
          className="submit-button"
          disabled={isLoading || !query.trim()}
        >
          {isLoading ? "検索中..." : "検索する"}
        </button>
      </form>

      <div className="answer-area">
        <h2>回答:</h2>
        <div className="answer-content">
          {answer ? (
            <ReactMarkdown>{answer}</ReactMarkdown>
          ) : (
            <p className="placeholder">ここに回答が表示されます。</p>
          )}
        </div>
      </div>
    </div>
  );
}

export default App;
`src/App.css`を以下のように編集します。
.container {
  max-width: 800px;
  margin: 0 auto;
  padding: 2rem;
  font-family: sans-serif;
}

h1 {
  text-align: center;
  color: #333;
}

.search-form {
  display: flex;
  flex-direction: column;
  gap: 1rem;
  margin-bottom: 2rem;
}

.query-input {
  padding: 0.75rem;
  border: 1px solid #ccc;
  border-radius: 4px;
  resize: vertical;
  font-size: 1rem;
}

.submit-button {
  padding: 0.75rem 1.5rem;
  background-color: #0051c3;
  color: white;
  border: none;
  border-radius: 4px;
  font-size: 1rem;
  cursor: pointer;
  align-self: flex-start;
}

.submit-button:disabled {
  background-color: #999;
  cursor: not-allowed;
}

.answer-area {
  background-color: #f9f9f9;
  padding: 1.5rem;
  border-radius: 8px;
  border: 1px solid #eee;
}

.answer-area h2 {
  margin-top: 0;
  font-size: 1.2rem;
  color: #555;
}

.answer-content {
  white-space: pre-wrap;
  line-height: 1.6;
  color: #222;
}

.placeholder {
  color: #999;
}

.answer-content pre {
  background-color: #2d2d2d;
  color: #f8f8f2;
  padding: 1rem;
  border-radius: 6px;
  overflow-x: auto;
  margin: 1rem 0;
}

.answer-content code {
  font-family: Consolas, Monaco, "Andale Mono", monospace;
  font-size: 0.9em;
}

.answer-content p {
  margin-bottom: 1rem;
}
以下のコマンドでWorkers(frontend)をdeployします。
$ npm run deploy
動作確認
Workersのfrontendの開発用のURL(workers.dev)にブラウザからアクセスします。
質問の入力欄で「APIで取得できるデータの内容を教えて下さい」と聞いてみます。
無事にAIから回答を得ることができました。
AI Searchのパラメータオプション
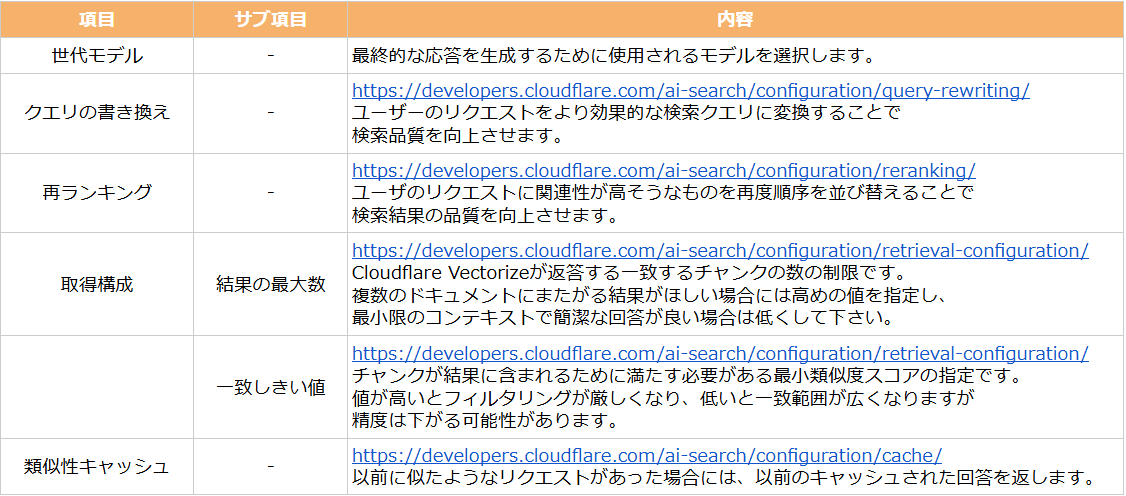
AI SearchはWorkersにてパラメータやメタデータをいろいろ指定することができます。
パラメータ: https://developers.cloudflare.com/ai-search/usage/workers-binding/#parameters
メタデータ: https://developers.cloudflare.com/ai-search/configuration/metadata/
R2にディレクトリを2つ作成しましたが、試しに片方(sample01ディレクトリ)だけを検索対象とするように変更してみます。
Workers(API)の以下の部分にfiltersを追加してみます。
上記に変更したらdeployしてみます。
ブラウザからアクセスして、先ほどと同じ質問(「APIで取得できるデータの内容を教えて下さい」)を聞いてみます。
sample02ディレクトリに含まれていた天気系の情報が返ってこなくなりました。
色々なパラメータやメタデータでfilterできたりしますので気になった方は参考にしてみて下さい。
パラメータ: https://developers.cloudflare.com/ai-search/usage/workers-binding/#parameters
メタデータ: https://developers.cloudflare.com/ai-search/configuration/metadata/
R2にディレクトリを2つ作成しましたが、試しに片方(sample01ディレクトリ)だけを検索対象とするように変更してみます。
Workers(API)の以下の部分にfiltersを追加してみます。
			const aiResponse = await env.AI.autorag(AI_SEARCH_NAME).aiSearch({
				query: userQuery,
				stream: true,
				rewrite_query: true,
				filters: {
					type: 'and',
					filters: [
						{
							type: 'eq',
							key: 'folder',
							value: 'sample01/',
						},
					],
				},
			});
上記に変更したらdeployしてみます。
$ npx wrangler deploy
ブラウザからアクセスして、先ほどと同じ質問(「APIで取得できるデータの内容を教えて下さい」)を聞いてみます。
sample02ディレクトリに含まれていた天気系の情報が返ってこなくなりました。
色々なパラメータやメタデータでfilterできたりしますので気になった方は参考にしてみて下さい。
今後のロードマップ
現在、データソースとして使用できるのは
・R2のデータから情報を取得する方法
・WEBサイトに接続してそこから情報を取得する方法(今回未検証)
があるのですが、それ以外にCloudflare D1からもデータを取得できるようになる予定となっています。
・R2のデータから情報を取得する方法
・WEBサイトに接続してそこから情報を取得する方法(今回未検証)
があるのですが、それ以外にCloudflare D1からもデータを取得できるようになる予定となっています。
最後に
簡単ですがCloudflare AI Searchを検証してみました。
まだベータ版の機能ですが、RAGをマネージド環境で簡単に使用できるので本番リリースされたらAI環境を構築する要件の場合には選択肢に入ってくるかと思います。
AI Searchはベータ版なので機能に制限がかかってますが、値段はベータ版の期間は無料となってますのでこの機会に触ってみるのもお勧めです
Cloudflare Doc: https://developers.cloudflare.com/ai-search/platform/limits-pricing/
ブログのボリューム上、以下のような試せなかった機能もあったのですが、時間がある際に検証をしてみたいと思います。
openaiのモデルの使用(他のモデルも利用可)
https://developers.cloudflare.com/ai-search/how-to/bring-your-own-generation-model/
webサイトからデータの取得(NLWEB)
https://developers.cloudflare.com/ai-search/how-to/nlweb/
promptを使用した回答の制御
https://developers.cloudflare.com/ai-search/configuration/system-prompt/
そしてCloudflareなら上記以外でも、
・パフォーマンスの向上
・サイトの信頼性の向上
・セキュリティの向上
が、一つのサービスで実現できますので非常におすすめです。
Cloudflareに、アクセリアの運用サポートをプラスしたCDNサービスを提供しています
アクセリア自社CDNの開発と運用は、20年以上にわたります。それらの経験とノウハウを駆使したプロフェッショナルサポートをパッケージしたサービスが、[Solution CDN]です。
移行支援によるスムーズな導入とともに、お客様の運用負担を最小限にとどめながら、WEBサイトのパフォーマンスとセキュリティを最大限に高めます。運用サポートはフルアウトソーシングからミニマムサポートまで、ご要望に合わせてご提供します。
Cloudflare(クラウドフレア)の導入や運用について、またそれ以外のことでもなにか気になることがございましたらお気軽にご相談下さい。

移行支援によるスムーズな導入とともに、お客様の運用負担を最小限にとどめながら、WEBサイトのパフォーマンスとセキュリティを最大限に高めます。運用サポートはフルアウトソーシングからミニマムサポートまで、ご要望に合わせてご提供します。
Cloudflare(クラウドフレア)の導入や運用について、またそれ以外のことでもなにか気になることがございましたらお気軽にご相談下さい。
杉木 俊文
技術本部 プラットフォーム部


Contact usお問い合わせ
サービスにご興味をお持ちの方は
お気軽にお問い合わせください。
Webからお問い合わせ
お問い合わせお電話からお問い合わせ
03-5211-7750
平日09:30 〜 18:00